Adding Story Points
This section will present information on story points that you can create, how to create those stories, and how to use them to tell a complete story.
In the current version, you can add the following types of story points:
- Standard AOI: Create a story with Standard Area of Interest (AOI) on the map with visible layers.
- Historical Imagery: Create a story with ‘a series of images from the past up until the present’ for a specific Area of Interest (AOI).
- Comparison Slider: Create a story with only two images (from the two different dates or timestamps) to compare a specific AOI.
Standard AOI
Let’s create a story with Standard Area of Interest (AOI) on the map with visible layers.
Pre-requisites: A story is incomplete without the appropriate images and/or videos. Thus, it is recommended to add the relevant images or videos as layers to the workspace before creating a story.
To create a Standard AOI, do the following:
-
Open a Workspace and then click the Story tab.
-
On the Workspace Stories dialog box, click the + icon to add a new story.

The Story Composer dialog box is displayed.
-
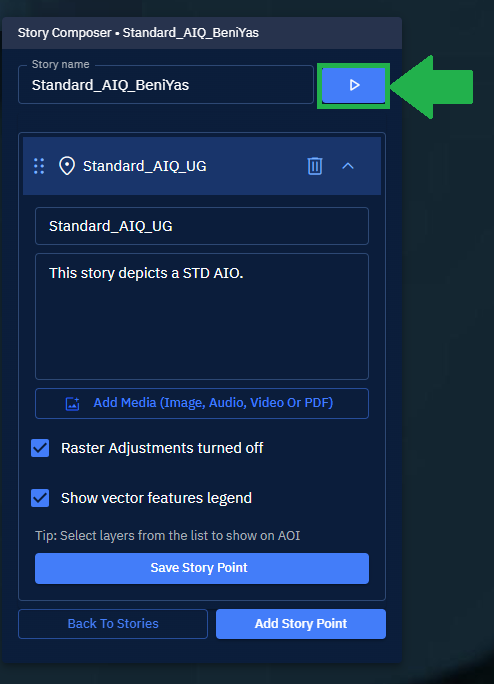
In the Story Composer dialog box, type the name of the story in the Story name field.
-
Click the Add Story Point button, and then select the Standard AOI option.

The Story Composer dialog box will automatically expand.
-
Write a clear and meaningful description explaining the story's purpose of the story, and then click the **Add Media **button to add various media. The platform uses this media as the display picture of the story.
-
Select one or more relevant layers from the right-hand section to add to the story, click the Eye icon to turn on the layer visibility, and then click the More Options menu to click the Zoom into Layer option.
-
Select the Raster adjustments turned off checkbox if you want to turn off the feature that enables you graphically manipulate a raster image.
-
Select the Show vector features legend checkbox to view a legend displaying appropriate information for each vector image.
-
Click the Save Story Point button to save all the changes.
-
Do one of the following:
- Click the Back to Stories button to go back to the Story tab.
- Click the Add Story Point button to add the next story.
- Click the Presentation mode button to display the story you just created.
Historical Imagery
Let’s create a story with ‘a series of images from the past up until the present’ for a specific Area of Interest (AOI).
Pre-requisites: A story is incomplete without the appropriate images and/or videos. Thus, it is recommended to add the relevant historical images or videos as layers to the workspace before creating a story.
To create a historical story, do the following:
-
Open a Workspace and then click the Story tab.
-
On the Workspace Stories dialog box, click the + icon to add a new story.
The Story Composer dialog box is displayed.
-
In the Story Composer dialog box, type the name of the story in the Story name field.
-
Click the Add Story Point button, and then select the Historical Imagery option.

The Story Composer dialog box will automatically expand.
-
Write a clear and meaningful description explaining the story's purpose of the story, and then click the Add Media button to add various media. The platform uses this media as the display picture of the story.
-
Select the Autoplay historical slideshow checkbox to auto-play the historical image presentation when you click the Presentation mode button.
-
In the Historical Imagery dialog box, test the presentation mode in the adjoining map by clicking the Presentation mode button.
-
In the Historical Imagery dialog box, click the Export icon to save the imagery as PNG or JPEG. Select the Add acquisition date-time on image checkbox to include the date and time on the exported images.
-
In the Historical Imagery dialog box, click the Settings icon, and then select the Show acquisition time and Show Layer Name to display the acquisition time and layer name on the historical presentation. In addition, increase or decrease the playback time of the presentation (in seconds) by typing a number in the Playback Speed field.
-
Do one of the following:
-
Click the Back to Stories button to go back to the Story tab.
-
Click the Add Story Point button to add the next story.
- Click the Presentation mode button to view the historical presentation.

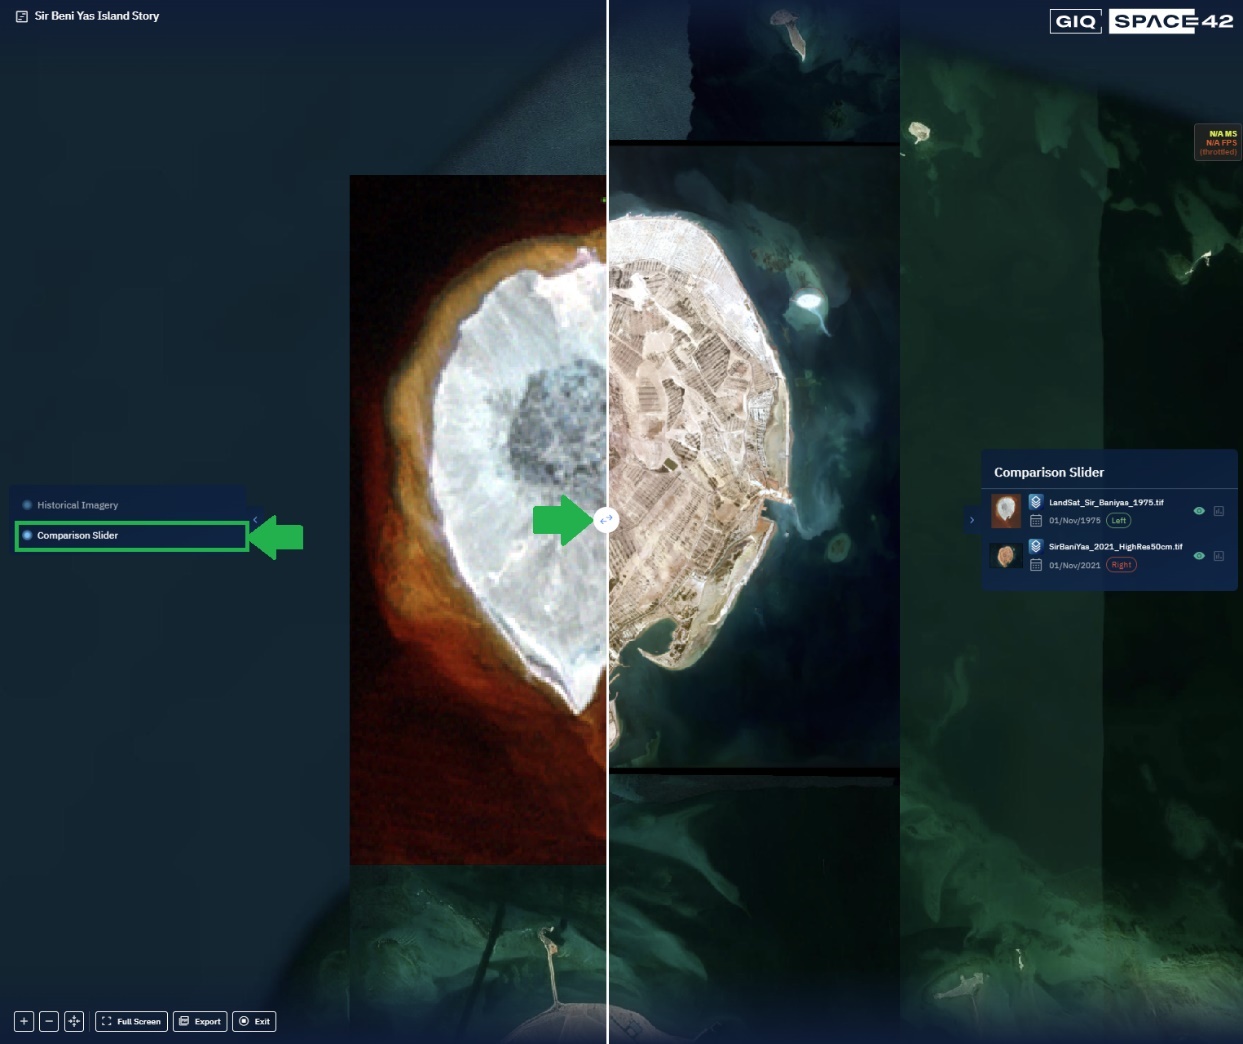
The platform displays the historical presentation in a new window with the same name as the story. For example, the preceding presentation is named Sir Beni Yas Island Story.
- In the Story Presentation window, click the presentation button on the Historical Imagery dialog box to view the story.
Comparison Slider
Let’s create a story with only two images (from the two different dates or timestamps) to compare a specific AOI.
To add a comparison story, do the following:
-
Open a Workspace and then click the Story tab.
-
On the Workspace Stories dialog box, click the + icon to add a new story.
The Story Composer dialog box is displayed.
-
In the Story Composer dialog box, type the name of the story in the Story name field.
-
Click the Add Story Point button, and then select the Comparison Slider option. The Story Composer dialog box will automatically expand.

-
Write a clear and meaningful description explaining the story's purpose of the story, and then click the Add Media button to add various media. gIQ uses this media as the display picture of the story.
-
Click the Selected 0 of 2 Layers for Comparison button, select two images for comparison from the right-hand section, click the Eye icon to turn on the visibility, and then click the three dots to select Zoom into Layer option.

-
Click the Stop Editing Comparison button and then click the Save Story Point button to save the changes you have just made.
-
Click the Presentation Mode button on the Story Composer dialog box.
The presentation mode for the story is activated.
- In the Story Presentation window, select the Comparison Slider on the left-hand side (if there are more than one story points) and then click the slider button to move the slider and compare the two images.